
Tutors’ Tutorial: Mixing In The Box – Part 2
Tutors’ Tutorial: Mixing In The Box – Part 2
Mixing in the box: Okay, valuable cliché time. ‘Start with the end in mind.’ There is a temptation to just start pushing faders around and see what happens. If you have an idea of what you want your final product to sound like, then you are more likely to get an appropriate result.
This means you need a plan and that you might need to do some research. Does the track remind you of another track that you like the sound of? See if you can find a copy of that track and have a listen. When you find something that meets the brief put it somewhere so that it’s available to you quickly – perhaps on a muted track in the session.
Listen to this track intently and decide what it is that you like about it that’s appropriate to your potential mix. I like to write these things down so that I can keep reminding myself of the intent. Your plan should include a map of where you want to position the different elements in the mix, both horizontally (using panning) and vertically (using EQ). Whether you are going to group elements such as drums together and how they are going to get to the stereo buss. (Are they going to use an independent sub group buss?) Which tracks may require dynamics processing (eg. gating or compression), and are you going to need to create an artificial space (reverb) in which to place the mix?
To get your session ready for the mix some ‘left brain’ activity is required. Based on your plan insert the plug-ins that you think you need on to the appropriate tracks. Create any sub groups that you need and route the appropriate tracks to them and then route them to the appropriate masters. Set up auxiliary busses for time-based effects, such as reverb, that you may use on multiple tracks.
In order to make accurate decisions with regard to volume a useful practice that was common in the ‘good old analogue days’ was to make sure that all your tracks are of equal volume. To achieve this analogue consoles often had a Return Trim or MTR Trim knob. Your DAW probably won’t have this but you can insert a plug-in at the top of the plug-in chain that has a ‘gain’ adjustment in it. Often these can be found in the Utility section of your plug-in list.
To achieve uniformity, take each individual fader and position it half way between unity (0dB) and the maximum level. Play the signal through the track and adjust the gain either up or down so that the signal peaks at unity. Once the gain is set, lower the fader to -3dB. If you apply this process to each track you will be making decisions based on equal volume. It also has the added benefit of ensuring that an appropriate level is going into your plug-ins to help them work in an optimal manner. (See graphic below.)
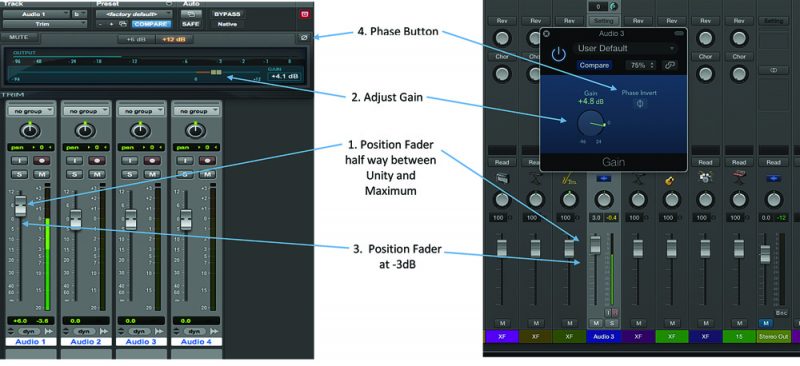
While you’re doing this it’s a good time to check the phasing of your tracks. Some DAWs include a phase button with their Gain plug-ins which is very handy. This is particularly valuable if you have recorded something with multiple mics. A good example would be acoustic drums as there are often multiple mics on the same elements especially the kick and snare.
Pick one track as the master for each element then change the phase on a second track while both are soloed. If the tracks are in phase then they will sound robust together, if they’re not in phase they will sound weaker. Apply this process to all tracks of the mix and check the phase between the individual elements. For example the bass in relation to the kick.
While you’re doing this you can also be ‘looking for the magic’ – the elements that are going to be the backbone of the track – the things that hook you and draw listeners into the song. Keep these in the back of your mind so that you can feature them in the finished track.
If the signal is too dynamic you could insert a plug-in, such as a compressor or gain rider, to control the variation. Leave adjusting it until you get into the mix. You could also consider where you want to pan elements within the stereo spectrum and roughly position them, but again this is a decision that can be made as you go through the mixing process.
The intention of this preliminary work is to make the mix process more streamlined and allow you to ‘just do stuff’. Just because you have inserted something doesn’t mean that you have to use it or be committed to it. As you go through the process you may well want to change some of these things.
Once you are happy with the basic session and are ready to mix make sure to save the session as a milestone mix and give it a x.00 suffix so that you can come back to it if necessary. Save all following mixes with an incremental suffix (eg x.01). Now you’re ready to start doing all the interesting and creative stuff, and that’s what we’ll be discussing in the next issue of NZM.
Mal Smith has been a lecturer at SAE Institute in Parnell for the past 15 years. He also mans the keys for Auckland band The Blue Jaffas. You can contact him at m.smith@sae.edu