

Tutors’ Tutorial: Recording Drums on a Budget
Tutors’ Tutorial: Recording Drums on a Budget
This Tutors’ Tutorial article is meant for those who have limited microphones, limited pre-amps/converters, and limited experience – but are still wanting to record a drum kit!
If you do have limited prior experience you’re probably best only using a few microphones. A large number of microphones tracking simultaneously leads to very complex relationships that are difficult to deal with – even for experienced audio engineers. Reducing the mic count also reduces these variables. Let’s consider this a good thing.
First off…
As acoustic instruments, drums interact with the room and that has a pretty big impact on the sound we get. The further from the kit our microphones are the greater becomes the space’s impact. For the most part we’ll probably be subject to our built environment and acoustic treatment is a whole other topic. What we have absolute control over however is the tuning of the drums. Tuning takes practice and if you aren’t experienced you’ll want to watch some tutorials and spend time getting this right before you start recording.
Two microphones (mono)
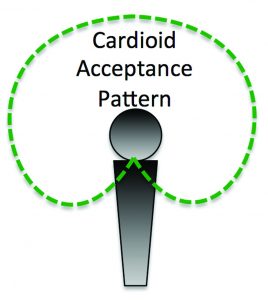
The focal parts of our kit are generally the snare and the kick. The trick here will be to pick up other parts of the kit while focusing on these two elements. An affordable go-to mic for snare drum recording is the Shure SM57 which will double as a good mic for guitar speakers. The SM57 is a dynamic mic with cardioid acceptance. This means that it has a high sound level tolerance allowing us to get close to the drums while also offering back rejection, i.e. objects behind the microphone will sound farther away than they appear. Drums to the mic’s side will however be well received. To hear a drum kit entirely recorded using SM57s check out Sara Smile by Hall & Oates.
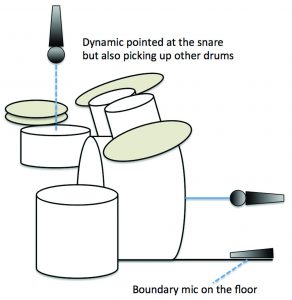
Boundary microphones (e.g. Shure Beta91, Crown PZM) are great for picking up an overall sound with a very round low-end. This makes them useful for getting a good kick sound as well as other parts of the drum kit, such as the toms and cymbals.
Start by placing the snare mic (e.g. SM57) above the snare with all of the other drums in its periphery. Have a listen and adjust its distance and angle to taste, just don’t get in the drummer’s way. We might also come in from the side – just be careful not to reject anything too much. With experimentation you will be able to use angles to balance other parts of the kit.
Four microphones (stereo)
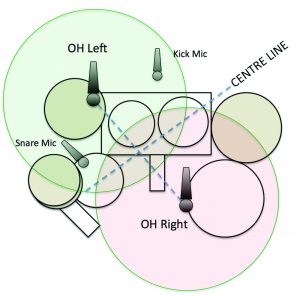
Let’s now bring the snare mic closer to the snare drum, and this time we will set up overheads. The most important thing to keep in mind here is where the kit’s centre is. I like to keep the snare and the kick in the centre so I visualise the middle of the kit as shown in the top-down diagram.
Editing
With so few microphones the editing considerations are fairly simple. Check that timing is correct and edit all signals as one. Then check phase. Because our kick mic is on the opposite side of the kit, it will need to be phase inverted. This function is usually represented as ø but you will need to work out how to do this with your software. For more information on phase you can refer to the Tutors’ Tutorial titled, It’s Just A ø, in the August/September 2014 issue of NZM, or just research phase online.
Mixing
If you’ve used two mics then these should be panned to the centre for a mono mix. This will give you more space in the sides for other instruments while keeping a strong percussive middle. If you’ve set up overheads then pan these left and right respectively. Since you’ve recorded so many drums with so few mics, the levels between these instruments may not be as even as you would like. This is a good time to reach for a compressor. We won’t go into compressing here, but again there is a wealth of documentation online.
This is a very glossed-over view of drum recording, and is intended only as a starting point for your own experimentation. Try playing with the guidelines noted but don’t feel like you can’t do something completely different. Remember, progress is often made by mistake.
Marcel Bellvé is a lecturer at SAE Institute in Parnell and can be contacted at m.bellve@sae.edu