Guitar Cool: Sixths Intervals
Guitar Cool: Sixths Intervals
When learning any musical instrument a major part of what you do is to learn how to finger and hear intervals. It’s no different for guitarists. It can get a little tedious learning all your intervals I admit, but if you take them slowly and in bite-size steps you won’t get bored and you will also learn them better.
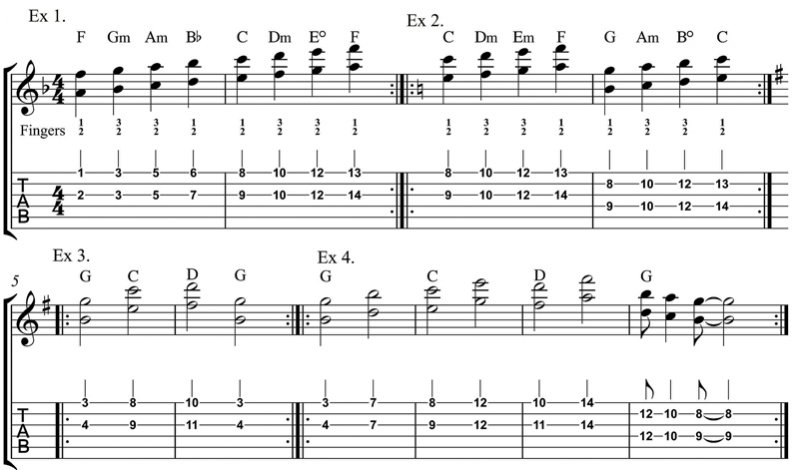
Why you need to know these sixth intervals is because you hear them a lot in rhythm/backup playing as well as solos. For example a rhythm player might substitute a sixth interval for a complete chord, as in Example 4.
You also hear them in solos – listen to the great blues guitarist Freddie King for example, some of his greatest licks use sixth intervals. The theory of sixth intervals is this – in the scale of C major the notes are C, D, E, F, G, A, B, C. The distance from C to A is a sixth. You can work it out by counting up the scale, C is one, D is two, E is three, F is four, G is five, and A is six. So whatever key/scale you are in count the bottom note as one and count six up the scale to get the sixth note.
The music shown in Example 1 is the F major scale harmonised with sixth intervals. Make sure to follow the fingering I have written out underneath the notes. You can also pick it a few different ways – firstly by using finger-style, secondly by using pick and third finger (which is called hybrid picking), thirdly by using a pick only to play across the three strings while muting the second string.
When playing Example 1 the first two notes sound like F major, the second two like Gmi, then Ami, Bbmaj, Cmaj, Dmi, Edim and Fmaj. So instead of playing big five or six string chords you can substitute with these little sixth intervals, which will make your music sound a little lighter and more interesting. It also makes it easier to move about the fretboard quicker.
In Example 1 the F major scale was going straight up the neck from F to F, but you can also play it as in Example 2. Here it is in the key of C major, but splits half way through. Again, watch the fingering as it can be a bit tricky if you are not used to it. Also notice the two bars use the same fingering.
 Once you have a good handle on these examples it would be a great idea to put this all to good use by getting a three chord song that you already know and using the ideas in Example 3. You may have to change the key, but that is easy enough by moving up or down the fretboard to suite. Now play along with the track and you will really get the sound and feel of sixths into your head and fingers.
Take a look at Example 4. You will see you can also substitute another sixth interval for G, C, or D. The first one uses the 3rd and root of the chord (bottom to top), while the second one uses the 5th and 3rd of the chord and gives a different sound. The last bar of Example 4 uses a passing sixth interval as the second interval.
Are you getting familiar with these sixth sounds now? Once you know what they sound like and where they are used they will jump out at you when you hear them on your favourite recordings, so keep your ears on alert.
Kevin Downing is a professional guitarist, teacher and author based in Palmerston North. His contact details, along with many freebies, are on his website at www.guitar.co.nz
